The Best Weeknight Taco Salad, Easy

Jump to Recipe

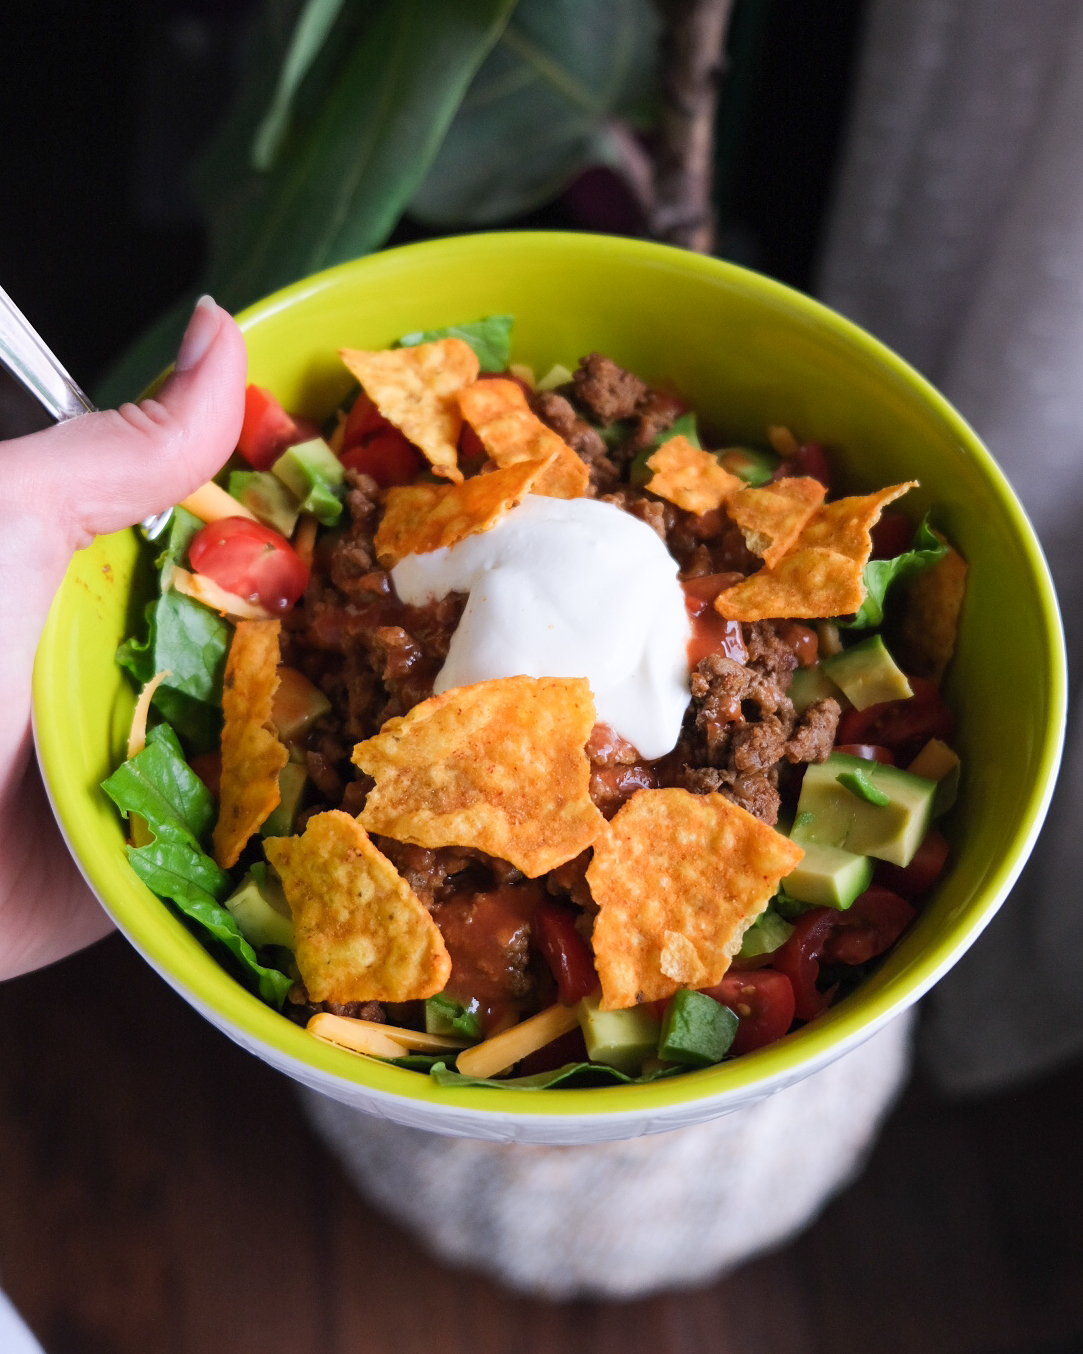
I started making this Taco Salad recipe about 8-10 years ago because I was missing the “Tacos in a Bag” I would get a high school football games. I love that its so quick and simple to make and you can add in whatever toppings you like.

Now I will argue that my recipe is a little more healthy, but the tacos in a bag are so fun and great for a crowd! It’s great for kids to be able to make their own and add what they like and be able to pick their favorite chips to go inside.

I love making this Taco Salad recipe the night before my husband’s shift, because I can have leftovers. This makes for great leftovers for lunch at work the next day or again for dinner.

Taco Salad for an easy weeknight dinner.

Easily turn this recipe to tacos in a bag, just by using snack size chips and adding in your ingredients. This would be great for any kids party, a sleepover, or and easy camping meal with less cleanup.

Don’t have snack size bags but still want the tacos in a bag? Try these paper snack bags that are recyclable!

I know I have been talking a lot about tacos in a bag than about Taco Salad. But the salad is definitely my favorite way to enjoy in on a weeknight. This recipe is just based off of the tacos in a bag because they were one of my favorite snacks. This way is just more dinner friendly because it’s more veggies and still delicious.

The Best Weeknight Taco Salad, Easy

Blaire
Prep Time 15 minutes
Cook Time 15 minutes
Total Time 30 minutes
Course Main Course
Cuisine American

Ingredients
  

  • 1 pound ground beef lean
  • 1 package taco seasoning
  • 1 head romaine lettuce rinsed and chopped
  • 1 cup cherry tomatoes rinsed and cut
  • 2 tablespoons red onion finely chopped
  • 1 cup old cheddar cheese shredded
  • sour cream for topping
  • hot sauce for topping
  • 1 bag Doritos or Fritos
  • 1 avocado finely chopped

Instructions
 

  • Brown your ground beef in a nonstick skillet, once cooked all the way through, drain off the fat
  • While your beef is coking, prepare your veggies by rinsing and chopping everything you would like to add
  • One beef is cooked and you have drained the fat, add in the seasoning packet and finish cooking according to the instructions.
  • Add everything to a bow, mix and enjoy!

Also try my Copycat Freshii Bowls for a healthy weeknight dinner.

If you try any of my recipes please let me know and tag me on Instagram because I would love to see it.

The Best Puppy Chow with 5 Ingredients

Jump to Recipe

When I was growing up, Puppy Chow was one of my favorite snacks that my mom would make for us. Not only is it yummy but its very easy to make and she always let us help. This recipe is so great because we usually always have all the ingredients on hand, and you only need 5 things!

I know some people called these “Muddy Buddies” but where I am from we called it Puppy Chow. Which sometimes concerned people when we told them we would bring it to a potluck or as a snack.

Easy and made with only 5 ingredients

For this recipe you only need a few things, a small pot, a silicone spatula, and a large bowl with a lid. If you don’t have a bowl big enough with a lid that’s okay. The lid just makes it easier to mix at the end, plus its fun to let the kids shake up!

Puppy Chow

Puppy Chow

Blaire
Easy Puppy Chow with only 5 ingredients
5 from 1 vote
Prep Time 0 minutes
Cook Time 5 minutes
Total Time 5 minutes
Course Dessert
Cuisine American
Servings 10

Ingredients
  

  • 8 cups Crispix Cereal
  • 1.5 cups semi-sweet chocolate chips
  • 1 cups peanut butter creamy
  • 1-2 tablespoons vegetable oil or butter
  • 2.5 cups powdered sugar

Instructions
 

  • Measure out your cereal into an extra large mixing bowl
  • On low heat, melt your chocolate chips and oil/butter together, stirring continuously until smooth. Don't walk away from your chocolate because it can burn very quickly!
  • Once the chocolate has melted, turn off the heat and stir your peanut butter until combined.
  • Pour mixture over Crispix and stir gently with a silicone spatula until the cereal is evenly coated.
  • Add your powdered sugar and shake with a secure lid (if possible). If you do not have a lid, carefully shake until cereal is evenly coated with the powdered sugar. Enjoy!

This recipe not for you? Try my favorite Peanut Butter Oatmeal Cookies with Chocolate Chips, it’s a firehall favorite!

Please let me know if you try out any of my recipes and tag me on Instagram because I would love to see it!

The Best Healthy Green Smoothie, Easy

This Green Smoothie is one of my go-to smoothies for breakfast or a healthy snack. If I’m not making my favorite blueberry peanut butter smoothie, I’m definitely making this one.

I used to have such a hard time making smoothies when I was younger and now that I have finally gotten the hang of it, it’s one of my favorite things for breakfast. It takes a bit of trial and error to keep these guys green too.

The Best Green Smoothie

Something I love about smoothies is that they are so easy and quick, with very little clean up. So these are amazing to take with you on your way to work, or to send with your kids to school. And it’s a prefect way to get some extra veggies in because you don’t taste the kale/spinach.

I absolutely love these glasses I got from Homesense, but there are some similar (and VERY trendy) ones here: ripple glasses.

Ingredients

  • 1 banana chopped, frozen or fresh
  • 1 cup yellow fruit, I used mango and peaches for this one
  • 1 cup packed spinach or kale rinsed
  • 1 cup almond or oat milk
  • 1/2 cup full fat greek yogurt
  • 1 tablespoon chia seeds
  • 1 tablespoon hemp hearts
  • 1/2 tablespoon maple syrup for sweetness if needed

Directions

  1. Add all of your ingredients to a blender and blend until smooth, I usually let mine go for a couple of minutes on high.
  2. Pour into your favorite glass and enjoy!

Tip: If your smoothie seems too thick just add a little more almond/oat milk to thin it out. Also, if you use any fruit that is red or blue/purple, your smoothie will still taste good, it just won’t be green anymore.

If you try any of my recipes, please take a photo and tag me on Instagram because I would love to see them!

Pulled Pork Nachos that are Easy and Delicious

These Pulled Pork Nachos are one of our favorite meals to make with leftovers from my Pulled Pork Sandwiches in the crockpot.

There is a lovely restaurant we like to visit when we visit my parents in Ohio and I love their Pulled Pork Nachos, but we are only able to get them every so often. So I figured I would make them myself and let me tell you, I love this recipe even more! It’s so easy to throw together with leftovers. And if you are making the whole thing just for the nachos it’s really easy as well.

I definitely recommend using my homemade BBQ Sauce for this recipe because it’s easy and so yummy. But we also love the Frank’s BBQ Sauce to top them with.

The Best Pulled Pork Nachos
We added a lot of cilantro looking at these photos, but it was so good.

Ingredients

  • 1 bag your favorite tortilla chips
  • 12 oz block of sharp cheddar cheese
  • 1-2 cups of pulled pork depending on how meaty you like your nachos
  • pickled and fresh jalapeños sliced into rings- add to your liking
  • 1/4 cup finely chopped red onion
  • * 1-2 stalks chopped green onion
  • *1/2-1 avocado chopped
  • *1/2 cup cherry/grape tomatoes cut in 1/2 or 1/4 depending on your preference
  • *1/4 cup sour cream
  • *juice of 1 lime, about 1-2 tablespoons
  • *1/2 cup cilantro rinsed and chopped
  • *1/3 cup BBQ sauce for topping

* add after removing from the oven

Directions

  1. Preheat your oven to 375°
  2. Spread your tortilla chips on a baking sheet lined with aluminum foil, then top with cheese, pulled pork, jalapeños and red onion. Bake for 8-10 minutes.
  3. While those bake, add your lime juice to the sour cream and tiny whisk until combined. This just makes spreading the sour cream easier. We also put it into a squeeze bottle to make it even easier and you can store the extra for a couple days.
  4. Remove your nachos from the oven when finished and top wit the rest of your ingredients, enjoy!

Note: If you have read any of my other recipes I’m sure you know I’m not a fan of measuring my ingredients. It is different for everyone so add what you like and if it seems like too much/not enough for you, just adjust to fit your taste.

My Favorite Easy BBQ Sauce

Homemade BBQ Sauce is one of my favorite things to make. Not only is it easy and delicious, but it fills your house with such an amazing aroma, you will be counting down the minutes until dinner!

I remember the first time I made this BBQ Sauce and my husband was outside working in the back yard. I had the overhead vent on so he could smell the sauce while he was outside. He could NOT stop talking about it and how he couldn’t wait to eat it which obviously made me very happy to hear.

If you have not made your own homemade BBQ sauce before, I highly recommend trying this recipe because it is so easy, and tastes so much better than store bought sauce. Don’t get me wrong, we still love our Frank’s BBQ Sauce, but they are so different it’s hard to compare.

The best BBQ Sauce

One of our favorite meals to enjoy this sauce with is my Crockpot Pulled Pork Sandwiches with Homemade Coleslaw. I cannot put into words how much I love these sandwiches but this is one of my ultimate comfort foods!

Add BBQ Sauce to your favorite pulled pork sandwiches

Ingredients

  • 2 cups ketchup
  • 1 cup water
  • 1/2 cup apple cider vinegar
  • 1 tablespoon worcestershire sauce
  • 1/2 lemon juiced freshly squeezed (about 2 tablespoons)
  • 1 teaspoon of your favorite hot sauce, we usually use Tabasco
  • 1 teaspoon fresh cracked pepper
  • 1/2 teaspoon onion powder
  • 1/2 teaspoon mustard powder
  • 1/3 cup of brown sugar
  • salt to taste (when finished cooking, only if needed)

Directions

  1. Add the first 6 ingredients to a pot and put on med high heat until it starts to bubble
  2. Add the rest of your ingredients and whisk until everything is incorporated and smooth
  3. Let gently simmer uncovered on low for about and hour, stirring occasionally
  4. Taste and add more sugar if needed (I usually just add a little white sugar if needed)
  5. Serve on your favorite pulled pork sandwiches, ribs, brisket, or whatever else you would use your favorite BBQ Sauce on!

This lovely recipe has been adapted from another blog linked here, so please check out her site!